Monday, 23 November 2015

AWS Command line

I have to admit that AWS Command line probably is the best thing about AWS.

I started using the AWS Command line over PoweShell and it is amazingly approachable and user friendly. 

If you are playing around in the UI, I seriously suggest using the AWS Command line. More info here.

Next step is to start using it in the Mac.

Tuesday, 16 June 2015

SQL Server Memory consumption (7GB)

My development machine started to run at snails speed with just a single instance of Visual Studio and SQL Server 2014 running. I have 8 Cores and 16GiB memory. 

The memory consumption was around 15.3GiB and it was hovering around the same figure continuously. 

Sql Server 2014 memory consuption

After hours of research I noticed that I had Distributed Transaction Coordinator (DTC) service stopped and disabled.

Distributed Transaction Coordinator (DTC) in operation

After restarting DTC service and restarting SQL Server, the memory consumption simply dropped to 7 GiB in total. 

Always check DTC Service if memory consumption with SQL Server is way over the top.

Monday, 8 June 2015

AWS: The specified queue does not exist for this wsdl version (.NET)

One of the demo applications I was working on suddenly started failing with the above error message.

This issue occurred when the AWS .NET SDK was used. Following is a list of pointers that might help you debug the issue. In my case it was the region information that somehow got lost!.

  • Log into the AWS Console and see whether the queue is present. This is a trivial check. However make sure to check region (e.g. EU Ireland, US West etc). The region is very important because queues are tied to the region you create them.
  • Then ensure you are using the correct fully qualified queue name. The fully qualified queue name includes the ARN (Amazon Resource Name) followed by the account number and the queue name.


Fully qualified queue name

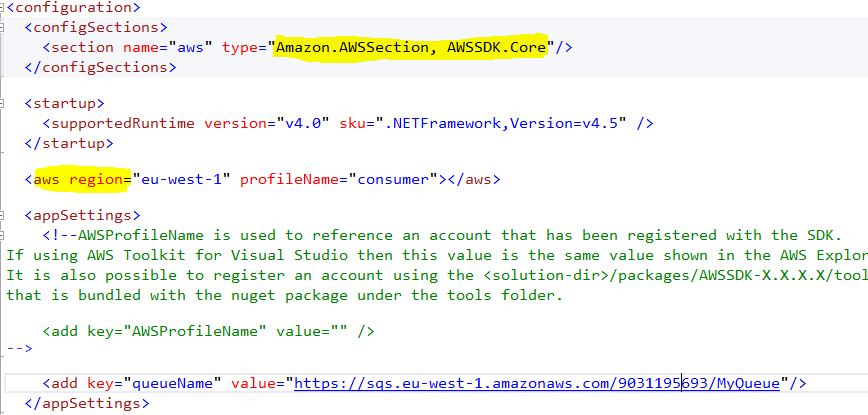
Once the above checks are confirmed you will need to ensure the code is using the same details. Normally about details are specified in the app.config (or web.config) file.

Specifying region using app-settings keys


The region details are specified in the following format:

Specifying the app settings (old style)

Alternatively, the more modern approach is through the custom app setting section.

Specifying region details through custom config section

Last resort


Once all the above steps/verification have been exhausted, you need to manually specify the region information in the code. See the following code snippet. 


The region endpoint is a property of the "Config" object and this can be set to the "RegionEndpoint" enumeration. 

The above code was the solution I used even with the fully qualified queue name is set in the app.config. Pretty odd in my book!!


Monday, 1 June 2015

Playing around with Amazon SQS (3) - sending messages

The previous posts illustrated the steps that are advisable for setting up the environment for an SQS application.

It is time to write some code!

The AWS toolkit for Visual Studio


The folks at AWS have been very kind to provide an amazing API coupled with a document and an toolkit for Visual Studio. The first task is to download and install the AWS toolkit for Visual Studio. This toolkit is similar to the services available in the AWS Console.

AWS toolkit for Visual Studio
The highlighted areas in the screen capture is quite important. 

The "profile" directly links to the secret key and access key. Profiles allow developers to access access keys securely rather than storing them in source control (app.config file). 

Normally AWS services are created in a region. The queue "MyQueue" was created in the Ireland region hence using the EU West as the region name. 

Refer to this link for more information.

Adding NuGet packages


The NuGet packages for .NET SDK are now streamlined for each AWS service. This makes the AWS assembly small. Here is a great link around the motivation to modularise the SDK.

Adding AWS SQS NuGet package


* Note that the NuGet package is still in preview (hopefully not for too long!)

Sending messages


The "Amazon.SQS.AmazonSQSClient" class is the entry point to SQS. Once an instance is created, the "SendMessage" or its async counterpart "SendMessageAsync" is used to send messages.

Consider the following sample code.


One of the questions that might arise here "how do you specify the account to use?". This is specified in the app.config file.


There is no explicit mention of an account but a "profile" is used to access the service. 

The messages appear in the AWS console once the above code is executed.

Messages in AWS console

OK, the messages are in AWS now, so how to receive these? That is the topic of the next post!

Saturday, 30 May 2015

Playing around with Amazon SQS (2)

In the previous post, I showed the way to create a queue and looked at some queue meta data. The next task is to create a couple of users with just enough permissions to use the queue.

There are multiple ways to set permissions to a queue. The permissions can be set at the queue level or user level. For the purpose of this post, I have decided to use user level permissions.

"Producer" and "Consumer" user permission

The Producer user require permission to send messages to the queue. The Consumer user receive message from the queue. The first step is to create these users in the IAM console.

Creating Producer and Consumer users

By default the "Generate an access key for each user" is checked. I have unchecked this for the moment. The access key is used by an application to make a connection with AWS.

The access key is comprised of two keys. The access key and the secret key. Consider these as username and password. Once the keys are generated AWS allows only a single chance to download the keys. However you can create multiple keys for each user.

User groups

Normally at this stage we set the required permissions to the users. However AWS recommends creating a user group and set permissions at the group level. This may be bit of an overkill in certain situations. However setting permissions at the group level is a tried, tested and reusable way to share access. 

Creating the Writer and Reader user groups

The AWS wizard prompts to associate a "Policy" when creating an user group. This can be skipped for the moment. Once the two user groups are created they are displayed in the user groups table. Notice the "Users" column, there are no users in these groups yet.

Add user to the group

The Producer and Consumer users must now be associated with the their respective group. This is achieved by selecting the user from users table and selecting "Add users to Group" from the following group property page.

Adding user to a group

The Producer user should be associated with the QueueWriter group and Consumer user should be associated with the QueueReader group.

Creating a new permissions ("Policy")

The permission to access a resource is configured through a "Policy". We need to create a simple policy to restrict access to the QueueWriter user group. This is where AWS shines in my opinion.

We need to select "Policies" from the IAM console and select "Create Policy".

Creating a new policy

The policies themselves comes in two flavours. The Amazon managed policies refers to "System" policies that have commonly used permissions bundles together. There is also the option to create custom policies. This is massively powerful, as we could start off from a Amazon managed policy and customise based on our requirement. 

Creating a custom policy based on an Amazon managed policy
The search for "SQS" and select "AmazonSQSReadOnlyAccess" policy to edit.

Editing SQS Read-only policy

Yes, this is a JSON fragment that describes the permissions associate with a read-only policy. This is not quite what is needed and needs to update next.

To start with, the policy name should be renamed to something meaningful. The "Actions" in the policy specify the allowed permissions. The "sqs:GetQueueAttreibutes" and "sqs:ListQueues" can be removed. The "sqs:SendMessage" is the replacement.

The "Resource" should be set next. In the previous post there was an explicit note to the fully qualifies resource name (ARN) of "MyQueue". That information is required to set the resource details. The completed policy looks like below:

Policy to send messages to the specific queue

The policy is now ready to be attached to the "QueueWriter" group. Return to the "QueueWriter" summary page and use the "Attach policy" to associate the policy with the group.

New policy attached to QueueWriter user group
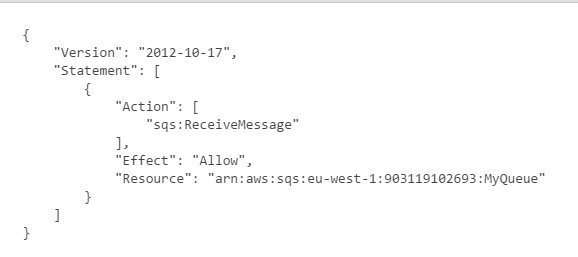
The next task is to create another policy for QueueReader user group to allow receive messages from the queue.

The receive message policy looks like below:

Receive message policy
At this point the QueueReader group is configured with receive permission for MyQueue.

QueueReader group permissions


Creating access keys for users

The access keys for Producer and Consumer users must be created next. This will allow these users to connect to AWS and send or receive messages from MyQueue.

The keys are created by navigating to the "Security credentials" section in the User summary page.
Simply select "Manage access keys".

Creating access keys for each user

Then follow the instructions and download the keys. Remember these keys are the username/password combination for each user and keep it safe!

Now we can write some code!! Get ready to use AWS .NET SDK!!


Playing around with Amazon SQS

The Amazon Web Services (AWS) Simple Queue Service (SQS) is a queueing service in the cloud. Any queueing system has a producer, who sends messages to the queue and a consumer who reads these messages from the queue. The whole point of having queueing middleware is not to overwhelm the consumer. Queueing middleware is also a choice for occasionally connecting components.

In this post I will describe how to go about implementing a very simple application using AWS SQS.

Getting started


Generally developers (including myself) guilty of simply commencing development with very little information. As our queue is going to reside in the cloud, we really should take a step back and think carefully. One of the key aspects we need to clearly understand is access permissions. We do not want our queue to be accessible to everyone under the sun. 

The service that is most talked about in any AWS conference or web cast is the Amazon Identity and Access Management (IAM) service. As the name implies, this service is used to create users/identities and assign permissions.

The producer of the application sends messages to the queue. Therefore we only require send permission to the queue. At the same time, consumer reads messages from the queue. We can create two users and assign the the minimum permissions.

Before we do create the users, we should ideally create the queue. In AWS a service is known as a "resource". So a queue is a resource. The access permissions can then be applied for the new queue resource.

If you do not have an AWS account, it is time to create one. There is now a free tier allowing a good deal of access to most of the services. Login to AWS console at http://aws.amazon.com.

The username and password you used to login to AWS Console is known as the "root" credentials.

Create the queue

In the AWS console, navigate to "Services" => "All Services" and you should see "SQS" as a selection.
AWS SQS Service under All Services

Once selected you can follow the wizard to create a queue. Make sure to accept all the defaults and name the queue "MyQueue". Once the queue is created, it appears in the "Queues" table.

Queues table with the newly created queue

If you now select the queue, AWS shows a whole collection of meta data about the queue. This is the most interesting bit.

Queue details

The URL is the public endpoint of the queue. The ARN refer to the Amazon Resource Name, which is the fully qualified queue name, that includes the region, account details and the queue name. Keep a note of the ARN as we will use this when setting permissions for the users.

The next step is to create couple of users with the just enough permissions to send/receive messages.


Friday, 8 May 2015

My first ("useful") Android app!

I have been playing around with Android Studio with help from Coursera Android courses.

The app is called "DailySelfie" (I bet the name gives it away!).

The video demo is below (this was created as a part of the final submission of one of the course):


In this post I am going to discuss how this is built and what fundamental elements were used.

Intents and Activities

The "Intent" is the eventing system in Android.  Intents are used to start an "Activity". From my understanding, an Activity refers to a self-contained user task that occupy one screen.

Intents are pretty powerful stuff. They allows passing data between screens. An Intent can also retrieve data from an Activity and return it back to the application. I used this technique to invoke the built-in camera application and return its status. The status in this case is whether the user cancelled taking the picture or not.

See the following code block:

The code creates a new instance of Intent by passing in a string constant. This string constant tells Android that "I need a way to capture an image". As there is no camera in my application, I am asking Android to find one for me. The above "kind" of Intent is known as an Implicit Intent.

It is possible that there can be multiple applications in a device that is capable of taking a picture. Android shows a dialog with all the applications that can be used to take a picture. In such situations we need to ask the user to pick the application they want to use. I am setting the title of this dialog to "Choose an application:". In theory you could have put a more customised title based on your application. By the way, Android has some conditions before choosing an application for this dialog. Check the documentation.

The fun begins when we call "startActivityForResult". This passes the Intent to Android. Android uses the Intent resolution workflow and hopefully bring the camera application or a chooser dialog to choose the application we like to use.

Language resources

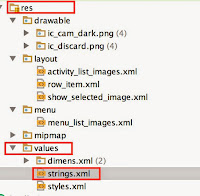
Some call this application localisation/ globalisation. We can easily make "Choose an application" an application resource by moving this to "res/values/string.xml" file.
String resources for an application

The string.xml file looks like below:


The code is update to the following:

The interesting bit here is the R.string.choose_app which maps to the string resource in the string.xml file. The "R" is built by Android with programmatic access to resources such as layouts, drawables and views (e.g. buttons).

This is enough information for the moment. In the next post I will talk about some other interesting bits!