Sunday 3 April 2016

AWS labs on qwikLabs platform

Last month @sebsto (March 2016) announced that all the labs on qwikLabs were FREE till the end of the month (March 2016). This was a great opportunity to learn (by doing) Amazon Web Services (AWS).

I managed to complete 2 Quests and have to say that my experience was pretty great. By following the labs I ended up spending more than 10 hours using the AWS platform for free. In the process I launched multiple EC2 instances, databases and deployed an application to a Docker container.

Completed Quests over the free period


When I started using AWS, I was not so sure what services were eligible for the free tier and ended up getting a bill at the end of the month. Since then I have been careful on what I use and switched off virtual machines as soon as the work is complete.

Now the offer period is finished, I can only wish the offer was extended (but it was not). But on the positive side, there are dozens of free introductory labs on offer. I think once you get started on a service you should be able to follow the documentation and learn about it a bit more. Therefore the free labs should be enough for me to start looking at new services without any risk of getting a bill at the end of the month.

My recommendation is to do as many labs as possible and learn about the platform. As many say, there is no substitute for the real hands-on experience, and these labs will start you on your journey.

Saturday 12 March 2016

AWS: 6. Improving CloudFormation template

The previous post covered the AWS CloudFormation template that I developed to provision the environment to deploy the "ApiService" web service. The following diagram illustrates my journey so far.

AWS Services used and their interaction
Although it looks very simple I covered many AWS services including EC2 Config Service (the service to bootstrap a Windows instance).

In this post I plan to improve the AWS CloudFormation template by implementing the following features.
  1. Further parameterisation 
  2. Creating the requisite Identity and Access Management (IAM) role
  3. Creating the Virtual Private Cloud (VPC) security group

Parameterisation


The new parameter section looks like the following.


I have parameterised the template so that the security key, availability zone, VPC and instance type can be determined at deployment time. I have also updated the template to resolve the Amazon Machine Image (AMI) through the "mapping" section. The mapping section follows a "dictionary" pattern where the key can be passed through using the intrinsic function "Fn::FindInMap".  See the following.


New IAM role


The purpose of the IAM role is to allow Elastic Compute (EC2) instance access to the Simple Storage Service (S3) bucket to download "ApiService" service binaries. In this particular case I am creating a role that has full access to S3 service. I have to admit that the syntax is not very intuitive.

The first step is to create the role. Thereafter an "Instance profile" resource needs to be created. From that I can gather, the Instance profile is an envelope that contains the role. This envelope is used to pass the role information to the EC2 instance.


Setting instance profile during EC2 provisioning.
The main benefit of the refined AWS CloudFormation template is that it creates the resources instead of using existing ones (e.g. security group and role). This can be very powerful because each stack can be created, and rolled back without leaving any residue.

The IAM role and Security group is created as part of the script and the only external resource I am depending on is the VPC. The VPC provides a personalised boundary over networking resources on the AWS platform and it is not something you should treat lightly. Normally there will be network engineers responsible for configuring and I doubt you will use an AWS CloudFormation template to provision a VPC (although it is totally possible, in fact I think we MUST to aid repeatability).

The updated AWS CloudFormation template is available here.

In the next post I plan to look at monitoring as it is something most developers leave to last. In my opinion monitoring must be a first class citizen of any solution design.

Monday 7 March 2016

AWS: 5. Automating the deployment and provisioning using AWS CloudFormation Service

In the previous post I deployed the "ApiService" to the AWS Platform using the .NET SDK.
That was really powerful and a step towards automating the provisioning/deployment process.

If we take a step back and look at the deployment of an application to production, you do not see C# code being executed to provision the production environment. This begs the question whether there is another way to deploy our simple application. In this post I am going to attempt using the AWS CloudFormation service to provision the environment and deploy the application.

AWS CloudFormation service


The AWS CloudFormation uses a form of Domain Specific Language (DSL) to define an environment. The AWS CloudFormation service accepts a text file that defines the environment and provisions it as a "Stack".

The following points describes some of the key benefits of AWS CloudFormation that I see as extremely valuable.

  • Automatic rollback when provisioning fails - my favorite!
  • Developers are fully aware of the production environment. 
  • Any change to the environment is managed through the CloudFormation template. (no random changes)
  • Allows repeatability to provisioning; hence can move between regions.

There are tons more benefits of using AWS CloudFormation, and refer to the documentation to find out more information.

Provisioning and deploying using AWS CloudFormation


The first step is to create a CloudFormation template. The template uses the JavaScript Object Notation (JSON) format. You can use any text editor to create one and I used Visual Studio Code as it has fantastic support for JSON.

A CloudFormation template at a minimum must contain a "Resources" section. This section contains the resources that must be provisioned. The template I developed for the ApiService looks like the following.

I think the above section is pretty clear and can be read without knowing too many details of CloudFormation. The section describes an EC2 instance and sets some properties such as Amazon Machine Image (AMI), Security group etc. These properties can be mapped directly to the .NET SDK example that was in the previous post. You can even see the "UserData" (bootstrap script) being used to install the application.

I have used some functions such as "Fn::Base64", and in AWS lingo these are called intrinsic functions. The parameters to the functions are passed using the JavaScript array format ("[]").

Parameterisation


Although it is not necessary, I have parameterised the template so that some of the values are defined at deployment time. There is a special section for parameters which is called "Parameters" (surprise). The parameters section looks like the following:


I have allowed the AMI, availability zone and Key name to be defined at the deployment time. Normally parameters are used to define values that should not be stored in the template such as passwords.

There is another section called "Outputs", that can be used to display information such as service endpoint or anything else that is useful once the provisioning is complete. In this particular case I am displaying the service endpoint.


Using the template


I used the AWS Console to upload the CloudFormation template. Of course this can be done through the AWS CLI too. The Create Stack option needs to be selected from the AWS CloudFormation landing page.

Creating a New Stack using AWS CloudFormation service

The next step is to upload the CloudFormation template.

Uploading the CloudFormation template

The next screen brings the CloudFormation template into life! The values specified in the parameters section is set available. (See the following)


Setting Parameters in the template

At this point CloudFormation starts provisioning the environment.

Provisioning the ApiService environment

The "Events" tab contains a list of activities that is being performed by the AWS CloudFormation service. Once the provisioning and the application is deployed, the "Outputs" tabs is populated with the endpoint to the "ApiService".

"Outputs" tab with service endpoint

The "ApiService" is now fully operational.


Service fully operational


There is no doubt the AWS CouldFormation service is so powerful and I simply scratched the surface. In the next post, I am going to look at AWS CloudFormation in bit more detail and try to incorporate few more best practices. 

PS - The full template is available here.


Sunday 28 February 2016

AWS: 4. Lanching an EC2 instance using .NET SDK

It is great to be able to very simply launch an EC2 instance and install the application using nothing but a S3 bucket (with binaries) and a bootstrap script. Imagine if you were able to automate this process.

There are multiple ways to interact with the AWS platform. The AWS Command Line Interface (CLI) and AWS Software Developers Kit (SDK) are one of the few methods. These methods allows developers and system administrators to write scripts to interact with AWS resources. In this post I will be using the AWS .NET SDK to automate the launch process of an EC2 instance.

The AWS .NET SDK has undergone a major restructuring during the last year. Now the .NET SDK is split by AWS service. The NuGet package of a service itself is split into two components, the "Core" dynamic link library (DLL) contains all the plumbing (signature creation etc.) and "Service" DLL contains the supporting classes for the service. The NuGet package that I will be using for this post is "AWSSDK.EC2".

I strongly recommend looking at the AWS .NET blog for updates and tutorials. 

The following .NET code launches a new EC2 instance and does exactly what the manual steps did in one of the previous posts.


The key pieces of information that is of interest are the following.

  1. The Amazon Machine Image (AMI) - In this particular case it is the golden image I created.
  2. Key pair - The *.pem key use to decrypt the administrator password.
  3. Security group - The security group that opens inbound port 88 and Remote Desktop Protocol (RDP) port. 
  4. The region where the instance will be launched
The above values needs to be obtained from the AWS Console except for the region information. Normally the region information is specified as an attribute in the AWS SDK configuration. In my case I am using "eu-west-1". 

There is tons of best practices around securely storing the AWS credentials so that you reduce the risk of adding it to a public repository like Github. Therefore I suggest you look at this post

So far so good. I managed to automate the EC2 launching process and able to horizontally scale the application with manual execution of the above script. In the next stop I am going to look further into automating the launch process. 

Wednesday 17 February 2016

A word on passing AWS Solutions Architect - Associate exam

The AWS Solutions Architect - Associate (SAA) exam is a very interesting beast and there is no doubt it is a valuable certification. Last week I managed to pass the exam with 72% which I am quite happy about (wonder where the last 28% went....)

I have worked with two camps of people, some who believe that certification is a fraud made up by vendors to make "more" money, and some who see it as a valuable achievement. I see certification as a nice to have personal goal, but never a replacement to real world experiences.

My advice for SAA exam is pretty simple. Give yourself at least 2/3 months and use the AWS platform as much as possible. Always start with basic tasks such as creating a S3 bucket, and attempt to use features in S3 to "productionise" it. Then think about how the S3 bucket can be compromised, and whether there are any safeguards in the platform that you can use. The AWS documentation is perhaps the best documentation I have ever come across. It is clear, concise and quite easy to understand.

There are number of courses in Udemy and I recommend you follow one of them. The Udemy course covers almost everything you need to know, but remember to understand the concepts. Knowing and understanding are two different things and make sure you follow the documentation to fully understand the concepts. I am not a bright person, and had to spend many hours reading through documentation to understand certain concepts. There are tons of materials on YouTube (AWS Deep Dives) that is extremely useful if you want to understand "how" and "why" certain things work the way they do.

Lastly, if you are taking the exam in the morning, make sure to have a very good breakfast and strong coffee because you will need it. The questions can be very long and you have to concentrate. Read the questions to the end and try hard to understand the question in the first or second go. Passing an exam require practise; what I mean here is not practising on the AWS platform but the good old questions. Find as many questions as you can, and do them many times. Try hard not to remember the answers but the concept. Research the questions; I found this to be very valuable, because it took me to parts of the documentation that I would never have read.

Good luck - you will need it!

Tuesday 19 January 2016

AWS: 3. Executing user data scripts at boot time

In the previous post I installed the AWS CLI in order to aid in accessing S3.


Enabling Instance user data script execution on startup


I would expect the script added to the user data section to execute during the boot up time. Generally this is the case, but in this particular case the script will not execute. The reason for this is that scripts specified in user data is executed once at the initial boot time. Launching a new VMs based on the custom AMI with user data is ignored because of this.

All hope is not lost through... because there is a way to enable user data script execution on boot up.

The Windows instances launched in AWS is packaged with a service called "EC2Config Service" which is used to enable advance feature. For more information refer to this.

The EC2 Config Service manages a file called "Config.xml" which is located in "C:\Program Files\Amazon\Ec2ConfigService\Settings" folder. This XML file defines the feature/tasks that are executed at boot time. What I am interested in is the "Ec2HandleUserData" feature that is the set to "Disabled" at the moment. I need to set this feature to "Enabled" so that user data scripts are executed during the next reboot. Once executed this setting is set to "Disabled" automatically so that scripts are not executed during subsequent reboots.

There is another tag called "Ec2SetPassword" which resets the password of the instance during boot up. I have enabled this feature too.  Going forward each instance will have its own password, which is good for security. Otherwise all the VMs launched using the custom AMI will share the same password. Byproduct of resetting the password is that the user data script executes under the local administrator account permissions. Otherwise the user data script executes under the EC2 Config service user.

The base image of the VM needs to be updated once above changes are made. The following screen capture illustrates the features discussed in the above sections.

Contents of Config.xml file (We are enabling Ec2SetPassword and Ec2HandleUserData features)

Launching a new VM with boot up scripts


A new VM needs to be launched with the user data scripts. The custom script looks like below:

<powershell>
aws s3 cp s3://simpleapistartup/ c://deployment/ --recursive
cd c:\Deployment
.\ApiService.deploy.cmd /Y -enableRule:DoNotDelete
</powershell>

Adding user data script during launch time


Once the VM is launched successfully (and both system and instance checks passed), I can simply use the following url to access the API service.

http://ec2-54-194-113-255.eu-west-1.compute.amazonaws.com:88/api/products

The domain name in this case is the EC2 public DNS name, followed by the port number (which is where the service is running). As a note, each EC2 instance has a unique DNS name, which means I need a way to aggregate multiple instances to provide a fault tolerance service.

The EC2 Config service maintains a log of the execution of instance user data script. This is located in "C:\Program Files\Amazon\Ec2ConfigService\Logs\EC2ConfigLog.txt" file.

Execution of the PowerShell script
I now can launch multiple VMs with an initial boot up script and access the service without having to setup anything. This is absolutely powerful. What is great about this is that the infrastructure is immutable. In the event an instance crash, I can simply start a new instance.

In the next post I am going to use the AWS SDK to automate the launch process.


Sunday 10 January 2016

AWS: 2. Getting the deployent files to an EC2 instance

In the previous post I created the base image with the requisite services (e.g. IIS, WebDeploy etc) for the simple API service.

Instead of logging into each EC2 instance and installing the application, it would be really nice if I can simply deploy the application on VM on start up. I can then deploy many VMs with the application with little manual intervention.

In this port I am going to do just that!


Moving the deployment files to Simple Storage Service (S3)


The S3 is a highly available and highly durable object storage service on AWS platform. The AWS platform itself use S3 as a backing (e.g. log files, backups).

The first step is to create a bucket and upload the files to this bucket. I have called this bucket "simpleapistartup". I can simply use the "Upload" button to upload the files to the bucket.

The WebDeploy packages uploaded to S3

Copying the installation files from S3 to EC2 instance


The files in the S3 bucket needs to be copied to the EC2 instance on startup. In order to copy the files, the EC2 instance must have access to the bucket. The recommended solution for accessing the bucket from EC2 instance is to create an Identity and Access Management (IAM) role and associate the role with the EC2 instance. The IAM roles allow AWS resources access to other resources without having to explicitly provide access or secret keys.

The IAM role can only be associated with an EC2 instance at launch time and not when it is in running state.

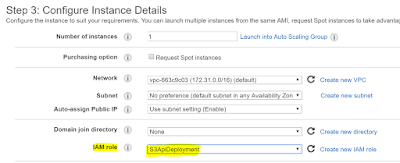
I have created the role "S3ApiDeployment" that has full access to S3 and associated it with the new instance.

Associating the role when launching a new EC2 instance

The next step is to provide the initialisation script to download the files from S3 to the C:\Deployment folder in the EC2 instance.

The AWS Command Line Interface (CLI)


The AWS CLI is a command line based interface for developing scripts to execute against the AWS Platform.

The first step is to download the AWS CLI from here. There are multiple flavours and I have chosen the CLI for Windows. Once installed I can execute commands such as the following to access S3.
  • aws s3 ls - lists all the buckets from S3


The plan is to run a script at VM boot time to download the files from S3. The following script copies the "simpleapistartup" bucket content including subdirectories to c:\Deployment folder.
  • aws s3 cp s3://simpleapistartup/ c://deployment/ --recursive

EC2 User data


The installation script is passed to the an EC2 instance through Instance User data. The User data is set during an EC2 provisioning stage. See the following screen capture.

Setting initialisation script through User data
It is important that "As Text" radio button is selected because the content is base64 encoded when transferring to EC2.

The AWS CLI script needs to be wrapped in "<script>" or "<powershell>" tags. See the following.


I decided to use "<powershell>" tag because I plan to include Powershell commandlets in the future.

OK!, this is enough for this post. In the next post I will launch an EC2 instance which will run the above script to copy the deployment files from S3.

References:

Monday 4 January 2016

AWS: 1. Creating a base image to make deployment faster

In the previous post I deployed a WebAPI service to an EC2 instance and accessed it externally.

The Windows VM image (Amazon Machine Image - AMI) I used did not have Internet Information Service (IIS) or WebDeploy installed. I had to enable or download these features or install.

What IF I needed anther VM to deploy the same application. Then I need to follow the same steps to install the components and features. This is not a very scalable process. The solution is to create a base image or golden image. Then I can create multiple VMs using the same image.

Creating the base image


The EC2 Dashboard provides the facility to create an image based on a running or stopped EC2 instance.
Creating the base image
The "Image" selection in the above menu allows me to create an image. The process to create the image can take few minutes and once created it appears under "Images"/ AMIs side menu.

Base image location

Launching a new VM using the base image


The base image is available under "My AMI's" and can be selected during the EC2 launch process.

Selecting the base image during EC2 launch
 I can follow the same steps and deploy the application without having to install any components.

Successful deployment
The deployment is successful!.

Now the base image is ready and I can deploy the application very quickly. In the next post I am attempting to make this process a lot faster. (Automation!)