Sunday, 30 December 2012

Entity Framework 5 - Auto incremental GUID columns

I started poking around Entity Framework 5 using VS 2012 Express edition.

One of the tests I wanted to do was to find out how EF5 handles auto-incremental GUIDs. So here goes...

Reproducing the problem


I will be using database-first model using SQL Server 2012 Express.


I have highlighted the important areas. Basically table has a "Status" column that is set to use "NewId()" binding. This will automatically create a Guid when a new row is inserted.

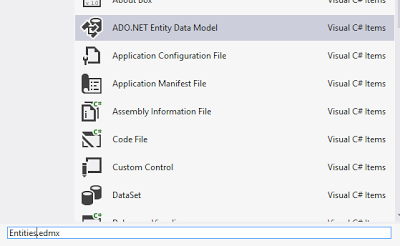
Thereafter a new conceptual model was created. (See below.)

Once the corresponding EDMX file is created, it will be opened in the Visual Studio editor by default. As there is only a single table in the database, one entity will be created.

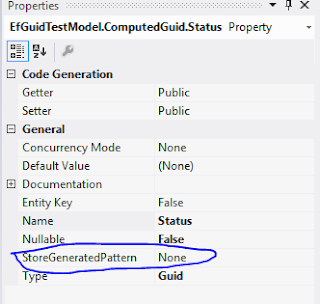
Click on the "Status" scalar property to view its properties.


Keep a close eye on the "StoreGeneratedPattern". This properties is what EF uses to determine the value population strategy of the given column. The available options are "Identity" and "Computed".

We set the binding in the SQL Server to auto populate the "Status" column (NewId()). However when we add a new row to the table using EF, following is what we get.


This is most surely not that we want. The "Status" value is set to the default Guid value.

Fixing the issue

Actually the fixing the problem is pretty easy... What we need to do is to return to the conceptual model and update the "StoreGeneratedPattern" of "Status" property to "Computed" as below.


By updating the property to "Computed"; it notifies the EF that the value of the property is calculated by the store (in this case SQL Server).


Just watch out!

Tuesday, 25 December 2012

Udacity CS101

I completed CS101 course offered by Udacity few days ago.

I must admit that I could not get every answer correct. This is the first time I am using Python and it opened a whole new avenue for me. It really sparked my curiosity with Python.

I highly recommend this course for anyone who is interested in learning computer science.

My certificate :-)

Saturday, 15 December 2012

Playing with Windows Service Bus 1.0 !!

I started looking at Windows Service Bus and Google was giving me a ton of resources for Azure service bus. I want Windows Service Bus!!

I started by reading through this article. 

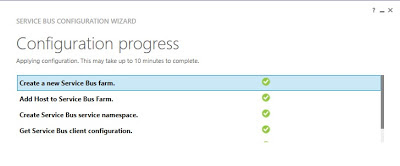
I managed to configure Windows Service bus using the instructions in this note. (See below).


I am using Windows 8 and using SQL Server Express 2012.

Once the installation was complete, I followed this note. One thing to note here is that the NuGet package name has changed from "Service Bus 1.0 Beta (for Windows Server)" to "Service Bus 1.0 for Windows Server".

I was unable to complete the exercise and the application was failing with an Authorisation failed  exception. 
However after playing with it for a bit, I managed to get it to work. The key to watch out are the Service Bus URIs. These can be found at the bottom of the dialog after configuring the Service Bus. (See below). 

The EndPoint is where the Service Bus is available at; and STSEndPoint is where the token for accessing the Queue is obtained. So... keep a note of these URIs. 

Code is here. (If you do look start looking at the code make sure to start the sender first and then the receiver.)


Sunday, 2 September 2012

Went to DDD10!

I was fortunate to attend DDD 10 last week. The session I attended were:

1  - CQRS and Event Sourcing... how do I actually DO it?  - Neil Barnwell

2 - ASP.NET MVC gone wrong - Stuart Leeks

3 - WebSockets and SignalR - Building the Real Time Interactive web - Chris Alcock

4  - Introduction to Aspect-Oriented Programming - Yan Cui 

5  - Windows 8 with XAML and C# - Kris Athi 

6 - Using actors with async in C# 5 - parallel programming the easy way - Alex Davies

The sessions were extremely useful and educational. I was very keen on CQRS and Neil pointed to many resources. There was lecture by Jon Skeet at the same time as CQRS session. I wish I could have been at two places at the same time!!!!!  DDD10 = 10/10!

Saturday, 21 July 2012

Back to basics(VSDBCMD.EXE command-line)

This is a command-line tool use in conjunction with new Visual Studio 2010 (VS2010) Database project type.

If you are new to VS2010 Database projects then I strongly recommend having a quick read on MSDN. In a nutshell Database project type allows you to source control the artefacts that you normally add to a SQL Server database (i.e. user defined functions, stored procedures). The output of this type of project is a *.sql file that you can run against the SQL Sever to drop and re-create the database with your artefacts in place. The output script takes care of checking for objects already created and dropping, re-creating in a consistent manner. 

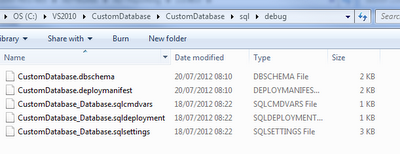
We can "build" this type of project in a TFS build server. However the output you get once you "build" this type of project in TFS or VS2010 is not the final *.sql file. So if you right-click the project and "build", what files do you get? (see the following)

Figure 1: Build output
No *.sql file is generated!. So why is it not generating *.sql file. We will need to build the project as  "Deploy" in order to generate the file. (see below)


Figure 2: Building the project as "Deploy"

Great, now we know how to do this using the UI. But since TFS projects are build as "Release" in the build server, we will need to use the VSDBCMD.EXE to generate the *.sql file.
See the MSDN complete overview of this tool.

This is how I used the command-line tool to generate *.sql deployment script. By the way the VSDBCMD.EXE executable is in "C:\Program Files (x86)\Microsoft Visual Studio 10.0\VSTSDB\Deploy" folder.


Figure 3: Executing VSDBCMD.EXE with manifest file.

As per the above log message, the deployment *.sql is now created. 

We can in theory execute this in the TFS build server itself. If you are interested in this, check this article in MSDN.

Wednesday, 18 July 2012

Back to basics (IDisposable)

In simple terms Disposable pattern provides a method to de-allocate resource in a deterministic fashion.

The .NET Framework provides the  "IDisposable" interface which we should use to implement the disposable pattern. The interface is very simple (see below).

        public interface IDisposable
        {
            void Dispose();
        }


The "expensive" resources are considered to be calls to files, databases, streams. We should consider implementing IDisposable pattern and gracefully release resources where necessary. So, how do we go about implementing the IDisposable pattern. Consider the following code snippet.

    internal class ExpensiveResource : IDisposable
    {
        private bool _disposed = false;

        public void DoExpensiveWork()
        {
        }

        public void Dispose()
        {
            Dispose(true);
            GC.SuppressFinalize(this);
        }

        private void Dispose(bool disposing)
        {
            if (_disposed)
            {
                return;
            }

            if (disposing)
            {
                ReleaseExpensiveResources();
                _disposed = true;
            }
        }

        private void ReleaseExpensiveResources()
        {

        }
    }

 To start, we have implemented the "IDisposable" interface for the type "ExpensiveResource". We have a overloaded  "Dispose" method. We use the overloaded method to add our custom code (i.e. code to release resources). 

Most importantly, the "Dispose" method can be called multiple times.Therefore we need to add safe guards in place. This is where "_disposed" field comes into play.

Since we are taking the ownership of disposing the object, there is no need for the Garbage Collector (GC) to call the "Finalize" method to dispose the object. Therefore we can suppress the call to Finalize. This is carried out by calling the "GC.SuppressFinalize(this))".

The C# "using" keyword can be used to elegantly dispose a disposable object. The consumer can write the following.

    internal class MyTestClass
    {
        public void DoStuff()
        {
            using (var expensiveWork = new ExpensiveResource())
            {
                // Do work
            }  - (1)
        }
    }

By the time the execution reach (1) the dispose defined in the type is called and object is disposed. 

.NET Tasks and IDisposable

.NET Framework "Task" by design implements the "IDisposable" interface, therefore an disposable object. But if we have to keep calling dispose at the end of each Task, then the source code will most surely become unreadable.

Read the following post from Stephen Toub - MSFT for more on disposing Tasks.

[The recommendation is not to dispose a Task unless you explicitly cause a Task to allocate a  IAsyncResult.AsyncWaitHandle.]

Monday, 18 June 2012

Good design by Dieter Rams...

We all need good designs that meet expectations. 

Following are some key design principals by Dieter Rams, which basically applies to every design.

"

  • Is innovative - The possibilities for innovation are not, by any means, exhausted. Technological development is always offering new opportunities for innovative design. But innovative design always develops in tandem with innovative technology, and can never be an end in itself.
  • Makes a product useful - A product is bought to be used. It has to satisfy certain criteria, not only functional, but also psychological and aesthetic. Good design emphasizes the usefulness of a product whilst disregarding anything that could possibly detract from it.
  • Is aesthetic - The aesthetic quality of a product is integral to its usefulness because products are used every day and have an effect on people and their well-being. Only well-executed objects can be beautiful.
  • Makes a product understandable - It clarifies the product’s structure. Better still, it can make the product clearly express its function by making use of the user's intuition. At best, it is self-explanatory.
  • Is unobtrusive - Products fulfilling a purpose are like tools. They are neither decorative objects nor works of art. Their design should therefore be both neutral and restrained, to leave room for the user's self-expression.
  • Is honest - It does not make a product more innovative, powerful or valuable than it really is. It does not attempt to manipulate the consumer with promises that cannot be kept.
  • Is long-lasting - It avoids being fashionable and therefore never appears antiquated. Unlike fashionable design, it lasts many years – even in today's throwaway society.
  • Is thorough down to the last detail - Nothing must be arbitrary or left to chance. Care and accuracy in the design process show respect towards the consumer.
  • Is environmentally friendly - Design makes an important contribution to the preservation of the environment. It conserves resources and minimizes physical and visual pollution throughout the lifecycle of the product.
  • Is as little design as possible - Less, but better – because it concentrates on the essential aspects, and the products are not burdened with non-essentials. Back to purity, back to simplicity.

"

Source Wikipedia.

Sunday, 10 June 2012

ASP.NET MVC 3 - SportsStore [using MVC 4]

I started reading the ASP.NET MVC3 book few weeks ago. The part 1 of the book builds a very nice e-commerce application called "Sports Store".

I have to admit that I read the ASP.NET MVC 2 by Steven Sanderson while ago. It was a one of the greatest reads! (I mean from cover to cover). Although Steven was involved with the ASP.NET MVC 3 book, I felt that it was bit rushed. But I really enjoyed it!

Since, MVC 4 and Visual Studio 2011 (beta)  are already in preview stage, I thought the best way to learn is to code "Sports Store" application using Visual Studio 2011 Beta and MVC 4.

I uploaded the project to codeplex too..
Sports Store using MVC 4 in CodePlex

See some of the screen captures.. (sorry about the images)

All Products

Products by category

Editing

Tuesday, 22 May 2012

Visiting the visitor pattern

A colleague of mine showed me the following result.


----------------------------------------------------------------
Current Drawing
----------------------------------------------------------------
Rectangle (10,10) width=30 height=40
Square (15,30) size=35
Ellipse (100,150) diameterH = 300 diameterV = 200
Circle (1,1) size=300
Textbox (5,5) width=200 height=100 Text="sample text"


He asked me whether I can write a simple console application to achieve the above result. Simple task you might say.

Well.. it is pretty obvious that we need to start off with an abstract "Shape" class. But what about the logic to "draw" the shape on the canvas. What we need is an interface like "ICanDraw", which contains the "draw" method. Now, the Shapes can be drawn, therefore the Shape should implement the "ICanDraw" interface. But hang on, each Shape should present itself to the canvas. The canvas should then decide how to "draw" the shape on the canvas.

The most interesting piece here is the text box.  A text box is not strictly a shape, but a "Rectangle" with a additional text property. We can say that a text box is composed of a Rectangle. Internally the text box will use the Rectangle to represent itself.

See the following UML.


My "ICanDraw" interface looks like below.


    /// <summary>
    /// This interface indicates that the shape can be drawn.
    /// </summary>
    public interface ICanDraw
    {
        void Draw(ICanvas canvas);
    }


The abstract "Shape" class looks like below.


    /// <summary>
    /// This is the base class for a shape.
    /// </summary>
    public abstract class Shape : ICanDraw
    {
        public int X { getprivate set; }
 
        public int Y { getprivate set; }
 
        protected Shape(int x, int y)
        {
            X = x;
            Y = y;
        }
 
        public abstract void Draw(ICanvas canvas);
    }


Keep a close eye on the abstract "Draw" method. Also notice that the "X" and "Y" are "readonly" properties. This plays nicely to the immutability of objects

The "Circle" class looks like below:


    /// <summary>
    /// This is the concrete implementation of a circle.
    /// </summary>
    public class Circle : Shape
    {
        public int Size { getprivate set; }
 
        public Circle(int x, int y, int size)
            : base(x, y)
        {
            Size = size;
        }
 
        public override void Draw(ICanvas canvas)
        {
            canvas.Draw(this);
        }
    }


The code for the text box looks like below.


    /// <summary>
    /// This is the concrete implementation of a text box.
    /// </summary>
    public class Textbox : ICanDraw 
    {
        public Rectangle Rectangle { getprivate set; }
 
        public string Content { getprivate set; }
 
        public Textbox(int x, int y, int width, int height, string content)
        {
            Rectangle = new Rectangle(x, y, width, height);
            Content = content;
        }
 
        public void Draw(ICanvas canvas)
        {
            canvas.Draw(this);
        }
    }


Ok, we have all the concrete classes and a special text box.

Next piece of the puzzle is the "ICanvas". Since we are just writing the content to the console, this will be a special console canvas. The canvas is aware of the shapes and will decide how to draw them. The responsibility to draw a shape is now with the canvas.

The following is the special implementation of "ICanvas" for the console.


/// <summary>
    /// This is the "canvas" representing the console.
    /// </summary>
    public class ConsoleCanvas : ICanvas 
    {
        public void Draw(Circle item)
        {
            Console.WriteLine("Circle({0},{1}) Size={2}", item.X, item.Y, item.Size);
        }
 
        public void Draw(Rectangle item)
        {
            Console.WriteLine("Rectangle({0},{1}) Width={2}, Height={3}", item.X, item.Y, item.Width, item.Height);
        }
 
        public void Draw(Square item)
        {
            Console.WriteLine("Square({0},{1}) Size={2}", item.X, item.Y, item.Size);
        }
 
        public void Draw(Ellipse item)
        {
            Console.WriteLine("Ellipse({0},{1}) DiameterH={2}, Diameter={3}", item.X, item.Y, item.DiameterH, item.DiameterV);
        }
 
        public void Draw(Textbox item)
        {
            Console.WriteLine("TextBox({0},{1}) Width={2}, Height={3}, Text={4}", item.Rectangle.X, item.Rectangle.Y, item.Rectangle.Width, item.Rectangle.Height, item.Content);
        }
    }


As you can see the canvas is aware of the shapes and it decides how to draw them. The canvas will determine this by the runtime type of the object.

Can you see a pattern here? This is in fact the "Visitor" pattern. The purpose of the visitor pattern is to choose a functionality depending on the run-time type of an object. The pattern is also used to introduce additional functionality to an object.

So how do we "draw" these shapes. See below.


        private static void Load()
        {
            var items = new List<ICanDraw>()
                            {
                                new Rectangle(10, 10, 30, 40),
                                new Square(15, 30, 35),
                                new Ellipse(100, 150, 300, 200),
                                new Circle(1, 1, 300),
                                new Textbox(5, 5, 200, 100, "Sample Text")
                            };
 
            items.ForEach(item => item.Draw(new ConsoleCanvas()));
        }

The special "ConsoleCanvas" visits each shape and "draws" it on the console.

In terms of SOLID principals, the "Shape" class is open for extensions and closed for modifications . Yes, the Open/Close principal.

But can the same functionality be achieved through another pattern?

Saturday, 5 May 2012

State and Strategy patterns

The State and Strategy patterns are very similar to each other but their use is somewhat different.

The state pattern is a way of encapsulating the behaviour of each state an object goes through. The state pattern fits nicely to model the operation of an ATM machine.

The key difference is that the state pattern is used to identify "states" which an object goes through. Where as the strategy pattern encapsulates a behaviour of the object. The state classes can be aware of the other states. This raise the question of coupling. For a system that is dynamically changing, then having states "knowing" other states might be acceptable.

The strategy on the other hand is an isolated functional unit and there is no interaction between the strategies. The context can choose which strategy to use where as the state is changed by changes to the internal state of the object. The most obvious way to use the strategy pattern is with the factory method.

Thursday, 3 May 2012

My battle with TFS 2010 Custom Activity (2)

So how does MSBuild activity works in the TFS 2010 build template. For that we need to have a closer look at the MSBuild activity.

See the following. I have highlighted the most important piece of information. The "OutDir" is the directory where the binaries are copied once a project has build successfully.


If this property is set to empty, the build output of a project will remain in the respective "bin" folder of each project (bin\Build configuration).

Therefore the first step is to set "OutDir" property to empty string.

The next step is to understand how the build process works.

We now need to look at the "Build Definition" process properties. (next post)

My battle with TFS 2010 Custom Activity (1)

I am sure by now you have seen the TFS 2010 build template. Pretty cool!

Normally if you build a solution is Visual Studio, the binaries can be found under the "bin" folder of each project. But if you notice the binaries coming out of a TFS 2010 build agent is dropped into a central location.

Some argue that this is a good solution. If you consider the references between project, having a folder for each project is very costly. The binaries can easily be duplicated over projects.

I recently had to make changes to the build process so that each project is built and dropped to a project specific folder. You might say that, surely TFS 2010 should support this level of customisation. But unfortunately this is far from being true.

I spend a whole day trying to figure out how to do this. Following are some solutions that I came across.


  1. Update to the Build Template Only
  2. Update to build template and each project in the solution


But my constrains were, no changes to the projects in the solution. Therefore solution (2) is out of the equation.

My expectation is below:

Drop folder/
               Project1
                    One.dll
                    Two.dll
              Project 2
                    Three.dll

The solution (1) is very promising but error prone. What if there are multiple solutions in the same workspace each using different projects? Then this method fails too.

So I am left is only a single solution, write my own custom activity.

My strategy is simple, build each project into their respective "bin" folders and copy the contents of the "bin" folder them across to the drop folder (under each project folder).

That is where the fun begin! (next post)

Sunday, 15 April 2012

Visitor Pattern : Revisited

Some developers find design patterns an "Advance" topic. But the reality is that we use design pattern every day and mostly without even knowing.

I find design patterns as an essential element in everyday development. I agree that reading the "Design Patterns" by the Gang of Four (GOF) can be challenging. But trust me, its worth the effort. Although I have not read this book cover to cover, it is an essential reference that you should have access to.

The intent of Visitor pattern according to GOF is "Represent an operation to be performed on elements of an object structure. Visitor lets you to define a new operation without changing the classes of the elements on which it operates.". I think for a developer, the second sentence is the most important piece "without changing the classes".

Consider an example where two tax rate applied to people based on their earnings. The idea here is to  create a "Visitor" to calculate the tax.

[Lets have a quick look at the UML. - Created using Creately]


Lets start with the "Person" class. This is an abstract class.


    /// <summary>
    /// This is the base class for people.
    /// </summary>
    public abstract class Person
    {
        public string Name { getprivate set; }
 
        protected Person(string name)
        {
            Name = name;
        }
 
        /// <summary>
        /// Accept a visitor so that new functionality can be added to the <see cref="Person"/>.
        /// </summary>
        public abstract void Accept(IVisitor visitor);
    }


The above immutable class has a method called "Accept". This is where we "inject" the visitor. The "Person" class is ready to entertain a "Visitor".

The next step is to create the two types of people. In this example they are high and low earners.


    /// <summary>
    /// This is a concrete class of a <see cref="Person"/>.
    /// </summary>
    public class HighEarningPerson : Person
    {
        public decimal Salary { getprivate set; }
 
        public decimal Rate { getprivate set; }
 
        public HighEarningPerson(string name, decimal salary, decimal rate)
            : base(name)
        {
            Salary = salary;
            Rate = rate;
        }
 
        /// <summary>
        /// The Visitor to this object works on the <see cref="HighEarningPerson"/> instance.
        /// </summary>
        public override void Accept(IVisitor visitor)
        {
            visitor.Visit(this);
        }
    }


This is followed by the low earning person.


/// <summary>
    /// This is a concrete class of a <see cref="Person"/>.
    /// </summary>
    public class LowEarningPerson : Person
    {
        public decimal Salary { getprivate set; }
 
        public decimal Rate { getprivate set; }
 
        public LowEarningPerson(string name, decimal salary, decimal rate)
            : base(name)
        {
            Salary = salary;
            Rate = rate;
        }
 
        /// <summary>
        /// The Visitor works on the instance of <see cref="LowEarningPerson"/>.
        /// </summary>
        /// <param name="visitor"></param>
        public override void Accept(IVisitor visitor)
        {
            visitor.Visit(this);
        }
    }


Both classes looks similar, but take a closer look at the "Accept" method. The "Accept" method receives the "Visitor" and calls the "Visit" method passing in the current object. The "Visitor" is now aware of the type of person it is dealing with.

The following is the interface of the "IVisitor".


    /// <summary>
    /// This is the interface of the Visitor that 
    /// works on the concrete types of people. 
    /// </summary>
    public interface IVisitor
    {
        void Visit(HighEarningPerson highEarningPerson);
 
        void Visit(LowEarningPerson lowEarningPerson);
    }


The "IVisitor" works with the concrete "Person" types. So in this case "HighEarningPerson" and "LowEarningPerson". You can see that "IVisitor" is using the method overloading.

Lets look at the implementation of the "IVisitor".


    /// <summary>
    /// This is the Visitor that calculates the tax for each person.
    /// </summary>
    public class TaxVisitor : IVisitor
    {
        private readonly ITaxCalculatorFactory _taxCalculatorFactory;
 
        public TaxVisitor(ITaxCalculatorFactory taxCalculatorFactory)
        {
            _taxCalculatorFactory = taxCalculatorFactory;
        }
 
        public void Visit(HighEarningPerson highEarningPerson)
        {
            var taxCalculator = _taxCalculatorFactory.Create(TaxType.High);
            var tax = taxCalculator.Calculate(highEarningPerson.Salary, highEarningPerson.Rate);
 
            Console.WriteLine("The tax for '{0} - HIGH' is £{1:00}", highEarningPerson.Name, tax);
        }
 
        public void Visit(LowEarningPerson lowEarningPerson)
        {
            var taxCalculator = _taxCalculatorFactory.Create(TaxType.Low);
            var tax = taxCalculator.Calculate(lowEarningPerson.Salary, lowEarningPerson.Rate);
 
            Console.WriteLine("The tax for '{0} - LOW' is £{1:00}", lowEarningPerson.Name, tax);
        }
    }


Do not pay too much attention to the "ITaxCalculatorFactory" that is used here. The reason for using the "ITaxCalculatorFactory" is to keep the creation of the objects out from business processes. Always keep in a note of the Inversion of Control (IoC).

The "TaxVisitor" calculates the tax rate of each person and displays the result.

Lets see how all of this fits in..

I have created a "Console" application. See the following class.


public class VisitorPattern : ITest
    {
        public void Execute()
        {
            Console.WriteLine("**** VISITOR Pattern *****");
            var lowTaxRate = 0.023M;
            var highTaxRate = 0.04M;
 
            var people = new List<Person>()
                             {
                                 new LowEarningPerson("Bob", 23000, lowTaxRate),
                                 new HighEarningPerson("Alice", 45000, highTaxRate),
                                 new LowEarningPerson("Peter", 13000, lowTaxRate),
                                 new HighEarningPerson("Pan", 100000, highTaxRate)
                             };
 
            var taxCalculatorFactory = new TaxCalculatorFactory();
            var taxVisitor = new TaxVisitor(taxCalculatorFactory);
 
            people.ForEach(person => person.Accept(taxVisitor));
        }
    }


We have a collection of "Person" objects. Each has its own type (Low and High earnings). The "TaxVisitor" visits each object and calculates the tax. The output looks like below.


We can clearly see that correct calculate method in the "TaxVisitor" is been called based on the type of the object.

The Visitor pattern is uses the "double-dispatch" to resolve a method call. Double-dispatch simply means the ability to choose the correct method at run-time. So in the above case, although we iterate over a collection of "Person" objects, the run-time type has been used to pick the correct method in the visitor.

Hope you will find this note useful.

Sunday, 8 April 2012

When it comes to bugs...

I have been doing more documentation (than an average developer) these days. I do understand how frustrating it can be to share a technical concept with a non-technical person.

I would like to share the following link related to the recent disruption to Microsoft Azure cloud computing platform. I have read many bug reports from Microsoft during the years and following in my book is ranked the highest. 


This report is clear, concise and transparent (which is not very common when it comes to software bugs.)

Thursday, 5 April 2012

Another look at Extension Methods


The C# 3 has somewhat revolutionised the way we use to write anonymous method. I am almost ready to say that lambda expression has rendered anonymous method “obsolete”. I agree that there are restrictions in anonymous methods such as it should be inline and cannot have multiple statements. 

The scope of this post is not to discuss about anonymous methods, but to look at much neater way of writing static utility methods. Please welcome Extension methods!

The development community have a wide range of ideas about extension methods, and some goes all the way of discounting it from the development toolset. I was reading the chapter on extension methods in Jon Skeet’s C# In Depth 2ed Edition (which I have to say probably one of the best investments I have done), and would like to share an example that I saw in this book.  See below.

C# In-Depth 2ed Edition – Jon Skeet (Chapter 10)


    public class Test
    {
        static void Main()
        {
            object y = null;

            Console.WriteLine(y.IsNull());

            y = new object();
            Console.WriteLine(y.IsNull());
        }
    }


    public static class NullUtil
    {
        public static bool IsNull(this object x)
        {
            return x == null;
        }
    }


Looking at the above code for the first time gave be the frights! For the C# gurus out there, it might be a piece of cake!

To the naked eye this code looks crazy, but for the person who knows the key concepts of extension methods, this is a simple exercise. 

Consider the following piece of code (from LinqPad).  

void Main()
{
       IEnumerable<int> myEnumerable = null;      
       var fives = myEnumerable
              .EmptyIfNull()
              .Where(x => x == 5)
              .ToList();
             
       fives.Dump();
}

// Define other methods and classes here
public static class EnumerableEx
{
       public static IEnumerable<T> EmptyIfNull<T>(this IEnumerable<T> enumerable)
       {
              return enumerable ?? Enumerable.Empty<T>();
       }
}


Please do not tell me that the above code is not sweet! I agree that this depends on the business case, but consider the possibilities. How often do you use FirstOrDefault() and check whether the return value is null.

 I use to be sceptical about extension methods, but now I am a believer!