The previous posts illustrated the steps that are advisable for setting up the environment for an SQS application.
It is time to write some code!
The AWS toolkit for Visual Studio
The folks at AWS have been very kind to provide an amazing API coupled with a document and an toolkit for Visual Studio. The first task is to download and install the
AWS toolkit for Visual Studio. This toolkit is similar to the services available in the AWS Console.
 |
| AWS toolkit for Visual Studio |
The highlighted areas in the screen capture is quite important.
The "profile" directly links to the secret key and access key. Profiles allow developers to access access keys securely rather than storing them in source control (app.config file).
Normally AWS services are created in a region. The queue "MyQueue" was created in the Ireland region hence using the EU West as the region name.
Refer to this
link for more information.
Adding NuGet packages
The NuGet packages for .NET SDK are now streamlined for each AWS service. This makes the AWS assembly small. Here is a great
link around the motivation to modularise the SDK.
 |
| Adding AWS SQS NuGet package |
* Note that the NuGet package is still in preview (hopefully not for too long!)
Sending messages
The "Amazon.SQS.AmazonSQSClient" class is the entry point to SQS. Once an instance is created, the "SendMessage" or its async counterpart "SendMessageAsync" is used to send messages.
Consider the following sample code.
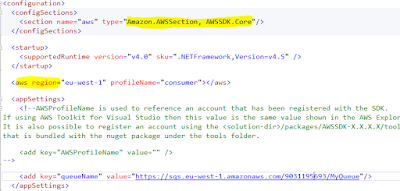
One of the questions that might arise here "how do you specify the account to use?". This is specified in the app.config file.
There is no explicit mention of an account but a "profile" is used to access the service.
The messages appear in the AWS console once the above code is executed.
 |
| Messages in AWS console |
OK, the messages are in AWS now, so how to receive these? That is the topic of the next post!


